GIMP Path Tool
GIMP's path tool enables you to draw bezier curves and turn them into a selection.
If you use illustration software (such as Adobe Illustrator, Freehand, CorelDRAW, etc), you're probably familiar with the term "bezier curves". To draw bezier curves in those packages, you use a tool such as a Pen tool, or a Bezier tool. These tools enable you to create complex, professional looking illustrations with machine-like precision.
In GIMP, the Path tool is kind of an equivilent of the pen/bezier tools in illustration packages. In fact, GIMP's Path tool used to be called the Bezier Selection tool.
You can select the Path tool from the main toolbox. The Path tool icon looks like this:
![]()
Earlier, when we created our smiley face image, we used the Path tool to create the mouth.
In that lesson, we didn't see the full potential of the Path tool. Although we managed to draw a nice smooth mouth, the full power of the Path tool becomes more apparent when you need to select complex shapes from an image.
Example
Take the following image for example:

If we wanted to extract the leaf, so that there was no grass in the background, we could select the leaf using the Path tool.
Here's what the photo would look like once we've drawn a path around the leaf with the Path tool:
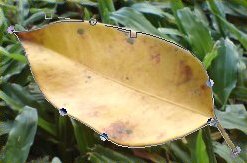
You can see the path following the edge of the leaf. You can also see "anchors", also known as "control points" at crucial points around the leaf. In total, there are 9 control points. You can also see the handles attached to one of the anchors (near the top of the leaf).
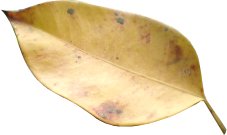
Once you've drawn a path around your object, you can create a selection from it. Then, you are free to do whatever you like with it. For example, you could remove the background, like this:
In the next lesson, we will look at how to use the Path tool and how to create a selection from your path.