GIMP Filters
In this article, we'll take a look at GIMP's filters. Filters can provide special effects for your image. Again, Photoshop users will be familiar with how powerful Photoshop filters can be. The same applies to GIMP filters.
What is a Filter?
A filter is a plug-in that modifies the appearance of an image, in most cases just the active layer of the image.
Or for a more technical explanation, a filter is a special kind of tool designed to take an input layer or image, apply a mathematical algorithm to it, and return the input layer or image in a modified format.
In other words, you can achieve some seriously cool effects with filters!
For example, there are filters to help you distort your image as much as you like. There are filters that turn your basic drawing into an artistic sketch. You can apply lighting effects to your image. And there's plenty more filters for all sorts of other effects.
Applying a Filter
We're about to spend about 2 minutes (or less) painting a picture. It won't necessarily be a pretty picture, but it will be a picture.
At the end, you will start to see the amazing power that filters provide. Using filters, anyone can make a bad sketch look interesting.
Try this:
-
Select the Brush Tool
Click the "Brush" icon on the main toolbar.
This selects the brush as our current tool. The brush icon is the one that looks like this:

-
Draw Something
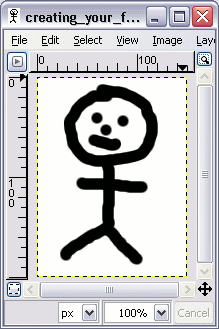
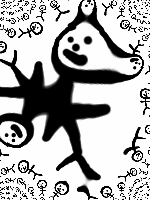
Draw a little stick man on your blank image.
Don't worry if it doesn't look very good. We'll be adding some effects to it next anyway.
-
Add a Filter
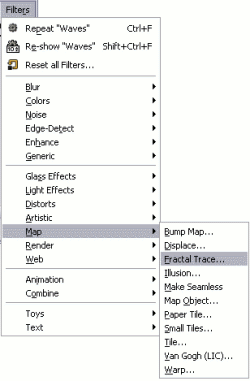
Now comes the fun part! We're about to add some filters for some special effects.
Select Filters > Map > Fractal Trace....
If you don't have the Fractal Trace option, choose another filter that looks good.
-
Add a Filter
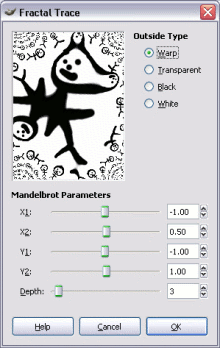
A dialog will open that enables you to change the settings for this filter. Experiment with the settings, you will see them being updated in the little preview box.
Once you're happy with your effect, click OK
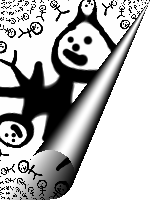
So within a few minutes, we have created our own strange little stick man and then warped him until we can't even recognize him!
Experiment!
Don't be afraid to experiment. You can always revert back to a previous state by clicking Edit > Undo or using Ctrl+Z.
Here's what the image looks like after applying another effect. This time I've added the "Page Curl" filter to the image: