Creating Your First Image in GIMP
Now that we've started GIMP, we have a choice of opening an existing image or creating our own one. We'll create our own image for now.
We'll create our own little smiley face. Like this:

Open a New (Blank) Image
To create an image, we first need to open a blank image, or blank canvas. Here's how to do that:
-
Start the Process
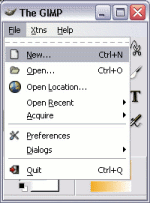
Go to File > New...
-
Set your Options and Create
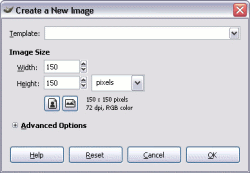
Choose the size you'd like your image to be. Feel free to select a template from the drop down menu.
You can also expand the Advanced Options menu for more options. For the purposes of this tutorial, simply type in the width and height as shown in the following screenshot.
Once done, click OK.
Resolution
72 dpi (as shown in the above screenshot) is OK for displaying your image on a computer screen (such as on a website). It is also sufficient for printing on a home printer.
If you intend to use your image for commercial printing purposes, you should increase this value. Commercial printers usually request high resolution images at between 240 dpi and 300 dpi. Beware that by using high resolution images, the file size will become much larger and it will take longer to download/email etc. To change the dpi value, click on Advanced Options and change the resolution.
You will now see a blank, untitled image. It looks similar to say, a blank word processing document.
Well, our blank image may look like a word processing document, but it doesn't act like one!
With our blank image, we have the ability to manipulate every single pixel. We can type text, paste photos, create a drawing, and much more. But more importantly, we have total control over where everything goes.
Anyway, let's create a basic picture for now.
Image Composition
Our smiley face image consists of a bunch of circles, a straight line, and a curved line.
To do this, we use a combination of the following tools:
- The Ellipse selection tool
- The Paintbrush tool
- The Pencil tool.
Here's how we do it.
The Face Outline
First, let's create the face outline. It's basically a circle, so we can use the Ellipse selection tool.
-
Select the Ellipse selection tool
To do ths, click the Ellipse icon from the main toolbar. The Ellipse icon looks like this:

-
Click and Drag
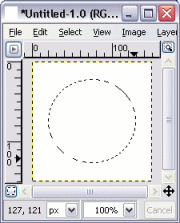
Now click and drag within the image area (also known as the "Canvas"). This will create a circular selection area, highlighted by an animated dotted line (also known as "marching ants"). For best results, start somewhere near the top-left corner, and release near the bottom-right corner.
You can see by the screenshot that the image is being displayed at its full size (the text "100%" is being displayed under the image). You can zoom in and out by clicking the down-arrow. Alternatively, you can select View > Zoom.
-
Open Stroke Settings
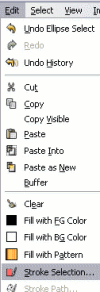
Now we will create a thick black line around our selection. To do this, select Edit > Stroke Selection...
-
Set the Stroke
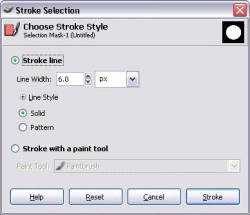
A dialog box will pop up. Set the stroke width to 6 px and ensure that Line Style is set to "Solid".
Once done, click OK.
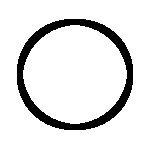
You should now see a black line in the shape of your selection. Your image should look something like this:
Removing the Marching Ants
You may notice that the "marching ants" remain on your selection. This is because the selection still exists (in case you need to do anything else with your selection).
Before you continue to the next step, you should remove the selection. To remove the selection, select Select > None (or keyboard shortcut: Shift+Ctrl+A).
Changing the Stroke Color
Your line may be a different color. This will depend on what color is selected as the foreground color on your main toolbox. If white is selected, you won't see your stroke (because the background is also white).
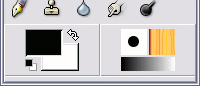
If this is the case, you will need to change the color. You can do this by clicking on the foreground color and changing it. The foreground color is the black part on the left side of the color area.
Here's a screenshot of the color area:
If you have trouble changing the foreground color, there's a more detailed explanation on our lesson for adding color.
The Eyes and Nose
We will now create the eyes and nose. We will do this with the paintbrush tool.
-
Select the Paintbrush Tool
To do this, click the Paintbrush icon on the main toolbox. The paintbox icon looks like this:

-
The Eyes
Now make two dots (where the eyes should be). To do this, simply click on the image where you want the eyes to be.
Dots will appear in the foreground color because we've got the paintbrush currently selected.
If you make a mistake, you can always "Undo" (Ctrl+Z) then try again.
-
The Nose
Now draw a line where the nose should be. You do this by clicking and dragging. Again, if you make a mistake, Ctrl+Z will undo it.
At this stage, your image should look something like this:

Now for the mouth.
The Mouth
For the mouth, we will use a more advanced tool. We will use the Path tool. This tool allows us to create smooth curves.
You may be wondering why we don't just use the Paintbrush tool for the mouth? Well, feel free go ahead and try! You'll find that it's extremely difficult getting the curved line to look nice and even while using the paintbrush tool.
The Path tool on the other hand, allows you to create a nice, smooth curve.
I should mention that the Path tool can take a bit of getting used to. It's not as easy to use as the Paintbrush tool. But I recommend practicing with the Path tool as it will give you much more control over your image compositions.
-
Select the Path Tool
The path tool is the one that looks like this:

-
Draw the Path
Click where the right corner of the mouth should be.
Now click and drag, starting from where the left corner of the mouth should be.
You need to drag to the right, and slightly up. You will see a path forming in the shape of the mouth. The path forms between your two anchor points. You will also see some levers with handles that enable you to change the shape of the path. Move the mouse around until you're happy with the shape. Then you can release the mouse.
-
Open the Stroke Option
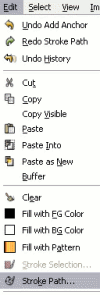
Select Edit > Stroke
-
Create the Stroke
When the dialog box pops up, click OK.
This is the same dialog box that popped up before when we created the stroke around the face. For now, we'll leave the stroke at the same setting as before (6 pixels and solid).
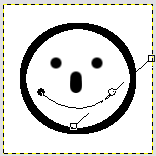
Your face is now complete. It should look something like this:
When you create a path, it is automatically saved so that you can use it again later. You can view your saved path by opening the Path dialog box (Windows > Dockable Dialogs > Paths).
Don't worry if you don't quite understand paths right now, we'll be covering them in more detail later.